ChewsWise Blog

ChewsWise Blog

Tartine Bread: the popular San Francisco bakery reveals its technique

Tartine whole wheat

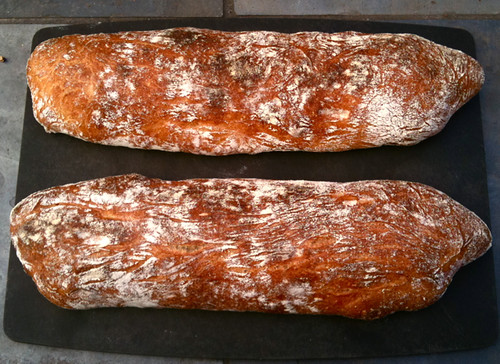
Photo: My take on Tartine's whole wheat bread with natural leaven

When you ask about great bakeries in the Bay Area, one place people always mention is Tartine. The bakery makes naturally leavened bread and has the distinction of baking loaves in the late afternoon, so that you can take one home right out of the oven for dinner. Or so I hear. Years ago I tried Chad Robertson's loaves when he up in Point Reyes. At the time, he had a wood fired oven and had built a strong following (a friend took me there on a visit). In fact, a picture of him in front of the hearth with a pile of dark crusty loaves graced the cover of a timeless baking classic, The Bread Builders: Hearth Loaves and Masonry Ovens.

Many years later, Robertson now has his own book, Tartine Bread. He writes:

During those early years in Point Reyes the small bakery was a laboratory for three ingreidients and a world of possibility: flour, water, and coarse grey salt from the Guérande in southwest France. I made most discoveries by exhaustive trial and error, over time gathering each lesson into a simple approach based on what I had learned. The approach was not rigidly scientific, but results were documented by concise shorthand notes and photos of the bread on days when something notable was achieved in crust or crumb. After years of baking in Point Reyes, I made the loaf I was after.

In 2002, Chad and his wife Liz -- a pastry chef -- made the move to the mission district in San Francisco, where they opened Tartine. They baked croissants and quiches in the morning and bread in the afternoon. Although he had to trade the wood-fired oven for a gas-fired deck oven, he wasn't worried. "Any flavor imparted by the wood fire is imaginary," he writes in the book. I would tend to agree, though this is the kind of argument bakers could only settle with a blind tasting and even then would quibble with the results. 

Tartine_bread In any case, this summer, the Tartine Bread book arrived in the mail -- an event I had been eagerly awaiting because I was curious about these loaves: loose and airy, a hint of natural leaven, without the acidity common to sourdough. Could it be done at home? After baking on-and-off with the book for a few weeks, I'd say, yes, with a caveat. The results don't come quickly and like all true craft work, you must put in some time to get what you're after. But you will achieve generously airy breads (like the 70% whole wheat loaf pictured above). Barely a month after the book appeared, home bakers produced some notable loaves with his recipes.

Robertson's main departure from standard practice comes with his natural leaven (I'm loathe to use the word sourdough, which is a misnomer, since this leaven is anything but sour). Unlike most leavens made with white flour, he uses 50% white and 50% whole wheat flour. Normally, that would lead to an explosion of activity, since the minerals and bran in whole wheat flour make for a very active starter that can be difficult to master.

But he tackles this problem by doing two things: first mixing a large amount of leaven - 400 grams total, or 2-3 cups - with just a tiny tablespoon of starter. Then he ferments it at a rather cool temperature to reduce its activity. The result is a mildly flavored leaven which when added to the dough inoculates the mix with copious amounts of yeast but has very mild acidic notes. Shining though is the sweetness of the wheat, which is probably why San Franciscans line up to get their hands on this bread. Plus the loaves just look gorgeous, judging from the pictures in the book by Eric Wolfinger.

His mixing and folding technique for the dough and loaves, while not new, is also not particularly well-known, especially when it comes to home bakers. For anyone wanting to avoid the tedium of kneading or using a stand mixer (another gadget you have to wash), his explanation and the pictures go a long way towards explaining this relatively labor-free technique.

Then there's his recommendation of baking in a cast iron combo cooker, which is kind of baking 2.0 compared to Jim Lahey's no-knead method of baking in a Le Cruset pot. The main advantage is that you don't have to drop the loaf into the vessel, which was always a bit troublesome. (Neither of these methods were new -- people have been baking in enclosed vessels for millenium). I don't have a combo cooker (I've come up with other fixes) but I'd be curious to try it.

I do have a few quibbles with the book. The basic recipe works best with a high quality all purpose flour but you don't get that tip until reading the detailed notes that proceed the recipe (so yes, read those notes). If you do use bread flour, the loaf will be tough. Finally, the volumes are generous, so you'll have to do some math to make a smaller loaf. This is especially true for the baguette dough, which at 2,300 grams is enough for 6-8 baguettes. The recipe says 2-3, which would be enormous loaves. I shape baguettes at 250-300 grams to fit my oven, which means I usually mix just over 1,000 grams of dough. 

But these are minor issues. Turn to the recipes at the end and along with the bread, you'll be seduced. Right now, I'm staring at Clarise's Meatball Sandwiches and my stomach is starting to growl. He's also got a savory bread pudding with leaks and mushrooms I'm dying to try (I've got the day-old bread on hand) and a kale ceasar salad, with home-made croutons of course.  

As for the bread recipes, they would be a serious clinic for a beginning baker, which is why I might not tackle this book if trying my first loaf. (It's also why I won't post a recipe: this book is more about technique than adding ingredients together). But if you've made a loaf or two and want to go further, or are simply curious about naturally leavened breads, I could think of no better place to begin. Robertson has graciously opened up his bakery to us, and it would be a shame not to put on an apron and take up his invitation to get busy. 

- Samuel Fromartz


GMO advocates walk out of sustainability standard talks

In an interesting development, advocates of genetically engineered crops have walked out of talks aimed at creating a standard for sustainable agriculture, according to Sustainable Food News.

Apparently, they felt the effort was dominated by "environmental groups, certification consultants, agro-ecology and organic farming proponents."

This tension was present from the beginning of this effort, which aimed to define what "sustainable agriculture" meant. When I first talked to participants a couple of years ago, they felt the talks were important because companies were already using the words without any precise meaning.

Those standards exist for organic food, based on law and regulations, but they are virtually meaningless when it comes to "sustainable agriculture." Obviously, the big questions were whether genetically modified crops, along with organic methods, should be included. It seemed like an untenable divide to bridge.

The "mainstream agriculture" crowd didn't think they were getting sufficient clout in this agicultural standard, so 10 of them withdrew from the effort. They were supported by a bevy of industrial agriculture proponents -- from fertilizer and chemical companies to the Farm Bureau. But here's the thing: 50 people remain.

It will be interesting to see where this effort now leads.

- Samuel Fromartz

Cibatta Recipe, at special request

Ciabatta, interior shot

Here's the receipe for ciabatta, which I negleted in the previous post. In part, I did this because the recipe is usually the least important part in baking and there are many recipes for ciabatta in cookbooks and on the web. (Here's two at Wild Yeast and Breadcetera). Far more important than the recipe is knowing how much to mix, how long to let the dough ferment and how to shape the loaf -- things that you learn the more you bake. But in response to requests here's my latest, which builds over two days to develop flavor. You can see this and other terrific loaves over at Yeastspotting.

Quantity: two loaves, 475 grams each.
Time: 16 hours to rise preferment, 12-24 hours final dough

Formula, baker's percentage

  • Flour 100%
  • Water 78%
  • Instant Yeast 0.4%
  • Salt 2%
  • Percentage of prefermented flour: 20%

Biga preferment

  • 110 grams flour (King Arthur or 365 brand organic all purpose)
  • 55 grams water
  • Two pinches instant yeast (pinch some between thumb and forefinger, add and repeat)

Mix flour, water and yeast until combined into a stiff ball. Cover and let sit at room temperature for about 16 hours or until ball has expanded but not collapsed.

Final dough

  • 420 grams flour
  • 360 grams water
  • All of biga
  • 1/2 teaspoon instant yeast
  • 11 grams sea salt

1. Mix flour and water together until combined and no longer lumpy. Let sit for 20 minutes.

2. Add biga by tearing off pieces, then add salt and yeast. Mix until combined for 1-2 minutes. Let rest for 10 minutes. Feel dough to make sure there is no undissolved salt. Mix again until dough is moderately developed -- that is, until you can stretch it but it will tear. You don't want to fully develop the dough because you will build gluten strength in folding. If you mix too much the gluten will be too tight and you won't get those big holes.

3. Place dough in a oiled container and fold at 30 and 60 minutes. By now the dough should be glistening and the gluten fairly well developed. If not, wait another 30 minutes and fold a third time. Then place the container in the refrigerator for 12-24 hours. At the end of this time there should be visible bubbles in the dough of varying size. If not, remove it on the day you're baking and let rise further on counter for 60 minutes.

4. When ready to bake, preheat oven and baking stone to 480F. Place a rimmed sheet pan at the bottom of the oven.

5. Pour the dough out onto a well-floured counter and shape into a rectangle, being careful not to deflate the dough or manipulate it too much. (The more you move the dough around, the less holes you will have). Cut the rectangle in half into two loaves. Carefully move the loaves onto a well-floured couche or board. Sprinkle with flour, cover with plastic wrap or a tea towel and let rise for 45 minutes to 1 hour. When pressed slightly, the dough should spring back slowly.

6. Place parchment paper on a cutting board or peel. Carefully pick the loaves up and invert them onto the parchment paper. (Fish spatulas are great for this, or if using a couche, roll the loaf onto parchment paper). Slide loaves into the oven. Pour 1/2 cup water onto the tray at the bottom of oven. Let bake until well-done, 22-25 minutes.

Here's a video from Wild Yeast Bakery in the U.K. on shaping ciabatta, though I tend to manipulate the dough less than this baker. Still, you can see, he's careful not to deflate the dough.

Ciabatta: All in a day's -- make that two days -- work

Ciabatta, interior shot

I've been working on this Italian ciabatta for a couple of weeks, writing about the process as I go. I'm not sure where it will all end up, but it has been fun. This bread is made with a biga, or a hunk of stiff prefermented dough with a pinch of yeast, that rose for 16 hours. I then mixed the biga into the final dough, which itself rose slowly in the refrigerator for another 19 hours. The result was a light, sweet, and chewy crumb and crisp dark crust that made for a perfect sandwich today -- or actually two. 

Ciabatta

Top Chef for Bakers

Chefs get all sorts of attention in competitions, but bread bakers, fugetaboutit! 

But I was recently in Las Vegas for a bread convention - yes, related to the new book I'm working on - and observed a bit of the Louis Lesaffre competition. In this stage, national teams from North and South America competed for two coveted places in the Coupe du Monde in Paris in 2012. USA made the winning spot as did the team from Peru. They will compete against 10 other national teams at the final competition. Background on the competition process is here

Bread Sculpture, Harry Peemoeller, Team USA

Bread sculpture by Harry Peemoeller, instructor at Johnson and Wales, Charlotte, NC. Yes, this is all made of bread!

IMG_0735.JPG

Mike Zakowski, The Baker (Bekjr), Sonoma, CA, with his baguettes, which are obviously central to this competition.

Team USA breads

Pictures of Mike Zakowski's breads.

One of Mike's entries was a loaf with bolted whole wheat flour (part of the bran removed) mixed with white flour, flecked with cracked spelt that had been soaked in agave nectar for 12 hours. It was the best bread I had at the entire convention, though there were many great breads. I asked him where he got cracked spelt, since I had never seen it. He said he grinds it himself with a hand grinder. Although he works at Artisan Bakers in Sonoma, he sells his own bread at a farmers' market in Oakland.

I did take pictures of the beautiful viennoiserie made by Jeremey Gadouas, a baker from Bennison’s Bakery, Evanston, IL, but alas they were too blurry.

There was a lot of baking going on outside the competition. Here are a few of the rye breads made by Jeffrey Hamelman, the master baker at King Arthur Flour.

Hamelman's 40% rye

Hamelman's 40% rye, it had nuts and dates I think but I may be wrong. 

Jeffrey Hamelman

Jeffrey Hamelman in a light moment by the deck oven.

Hamelman's 60% rye

Hamelman's 60% rye. The one barely viewed on left has sesame seeds. The scoring (cuts) on these loaves were beautiful.

- Samuel Fromartz

The gardener's choice: What to grow?

CabbageChinese cabbage and daikon from last year's garden

In our garden this time of year, I grow a lot of Asian greens for a couple of reasons: first, they germinate and grow extremely fast and secondly, supermarkets and even farmers markets tend to have just a sampling. Asian markets in the suburbs have more choice, but the quality can be iffy and the veggies aren't organic.

So as the summer heat finally died down, I sowed mizuna, mibuna, Chinese broccoli, daikon, bok choi, tat soi, two varieties of Chinese cabbage, mustard, turnips, red carrots, as well as a couple of varieties of lettuce that I don't often find, like red iceberg, a heirloom. I'll be drowning in Asian greens and lettuce in about 6-10 weeks and making my own kimchi.

I thought about this approach - grow what you can't buy - when I read this interesting piece about a gardener in England, Mark Diacono, who has a new book, Taste of the Unexpected. He talks about how he decided what to grow:

I did a little research, whittling out the truly impossible as well as anything cheap and widely available. What was left formed my first wishlist: mulberries, apricots, medlars, persimmons, quinces, pecans, olives, peaches, walnuts, mizuna, Szechuan pepper, kai lan and almonds. What a menu. Otter Farm was on its way.

On top of that, he bet climate change would make it possible to grow plants more common to the Mediterranean than the UK. 

Apricots, peaches and nectarines, among others, will get plenty enough sun in England to ripen happily, but the frosts can nip the blossom and kill off any chance of fruit. I was convinced that climate change would make those late frosts fewer and farther between, so I planted.

What I liked most was this list of how to think about what to plant. So here's Diacono's 13 steps (edited a bit from the full list at the Guardian link above):

1. Drawing up your wishlist is the key step ... forget about any limitations your garden may have and think imaginatively. Let flavour be your guide.

2. Grow what you most like to eat. Make a list of all the food you love. Add to it anything you love the sound of. 

3. Grow what you can't buy. Some homegrown foods bear little resemblance to those in the shops. Grow them for yourself and get them to the kitchen within minutes and they will taste luxurious.

4. Grow something unexpected. Quinces, mulberries and salsify are three of the many that don't suit the supermarket system, and all are among the very finest food you can eat. 

5. Challenge your tastebuds. If you hate it, grow it, at least once. Chances are it'll be so far removed from what you buy in the shops, or be so fine in combination with something else you grow that you'll be converted.

6. Grow food that's expensive to buy. It makes little sense to grow the cheap stuff and keep forking out for the pricier food, but that's exactly what most people do. Grow something delicious and expensive instead. 

7. Transformers. The transformers are those harvests that ensure your main crops have any number of costumes to dress up in. They are typically long on flavour and short on volume – herbs, Szechuan pepper, Egyptian walking onions, etc. 

8. Think seasonally. It can be tempting to concentrate on the height-of-summer loveliness, ignoring the fruit, greens, buried treasure, salads and nuts from the other parts of the year.

9. Quick return. Like most things, growing is about confidence and momentum, so enjoy the taste of success early. Include some cut-and-come-again salad leaves, intense microleaves and pinch off day-lily flowers within a few weeks or even days of them starting to grow and you'll taste the difference.

10. Go for diversity. Generally speaking, a little of lots rather than lots of a little is what you're after. Go for a broad range of foods as well as a number of varieties of each.

11. Aesthetics. A beautiful plot is undeniably more compelling to be in. Foster your own sense of the beautiful, afford it importance and you'll find your patch the place you most want to be for your morning coffee.

12. Get catalogues. When picking plants go to someone who does it for a living: they know what they're doing and they have an interest in you coming back. 

13. Be realistic about your time. In the first year, bite off less than you can chew. If I gave you a tomato plant to look after you'd probably find the time; if I gave you a two-acre field you might find other commitments get the better of you. 

HT to my friend the writer Roger Atwood who alerted me. 

- Samuel Fromartz

Flatbread, a Perfect Summer Bread

image from farm5.static.flickr.com
Image: Flatbread with chickpea, potato, spinach stew 

I wrote a story that ran today in the WaPo on a wood-fired baking class at King Arthur Flour. Here's the companion recipe on flatbread.


Summer is a great time to make this yeast-free flatbread, which takes minutes to cook on top of the stove. The recipe calls for chapati flour, a very finely ground whole-wheat flour that is available in Indian markets. You can use regular whole-wheat flour, but it must be sifted to remove any large particles of bran.

MAKE AHEAD: This dough is best made in the morning for use later in the day. The balls of dough can be refrigerated in a lightly oiled resealable plastic food storage bag for 2 or 3 days; let the dough come to room temperature before rolling. The flatbreads can be wrapped in aluminum foil and reheated in a 400-degree oven for about 5 minutes.

Makes 12 flatbreads

Ingredients:

3 cups (400 grams) whole-wheat flour or chapati flour, plus more for the work surface (see headnote)

Scant 1 1/4 cups (265 grams) water

2 tablespoons vegetable or olive oil, plus more for the bowl

1 1/2 teaspoons (8 grams) salt

Directions:

Combine the flour, water, oil and salt in a bowl until they come together into a mass. Let sit at room temperature for 20 to 30 minutes while the flour absorbs the water.

Lightly flour a work surface. (All-purpose flour can be used for this; if using whole-wheat flour, make sure it has been sifted to remove any large bran particles.) Transfer the dough to the work surface and knead for about 5 minutes by pushing down on and spreading the dough and then turning it over on itself, being careful not to rip the dough. It should be smooth and elastic. Form it into a ball and place in a clean, oiled bowl. Cover with plastic wrap and let the dough rest for 8 to 12 hours.

About 45 minutes before you want to bake, spread out the dough on a lightly floured counter and form into 2 logs. Cut each log into 6 equal pieces. You should have 12 pieces of dough that weigh about 2 ounces each; evenly distribute any leftover dough as needed.

Shape each piece into a ball. Let the balls rest for 30 minutes at room temperature under plastic wrap.

image from farm5.static.flickr.com  Place a cast-iron skillet over medium-high heat; cover with a lid. (Alternatively, invert a wok over a burner for cooking on the underside of the wok.)

Liberally flour a work surface. Flatten a dough ball and dust it lightly with flour, then use a rolling pin to roll it out as thin as possible (7 to 9 inches in diameter), rotating the disk to keep it even.

When the skillet is smoking lightly, gently lift a disk of dough. Place it in the skillet and cover immediately. Cook for 30 seconds to 1 minute, then flip the dough. Cover and cook for 30 seconds. (If using an overturned wok, simply place the bread on top of the wok and flip it when ready.) The breads will bake in 2 minutes and should be blistered and dark in spots.

Remove the flatbread and cover with a towel or aluminum foil to keep it from crusting over. (Dot it with butter and fold it in half if you like). Serve warm. These can be made in advance and stored in a resealable plastic container.

Recipe adapted from Jeffrey Hamelman, a master baker and bakery director at King Arthur Flour. Thanks to Yeastspotting for including this post.


Billions of Bugs Fly By in the Sky

NPR had a fascinating story today about how many bugs live up in the sky -- "a vast teaming highway invisible to you," reported Robert Krulwich. Laby bugs at 6,000 feet, beetles and fruit flies at 3,000 feet.  We're talking a lot, like 3 billion passing though a single mile of air space in a month. I've posted the audio above but the web link to the story has a nice animation as well.

Which makes me think, how effective can pesticides really be? The buggers are out there -- I mean, best to figure out a way to deal with them, without spraying chemicals, because frankly we will never be able to spray enough, because more will arrive, and then evolve to live with the chemicals and then lift off again and end up in another field thousands of miles away. But enough of my soapbox. Just listen to the piece.

What do you do with a whole Salmon?

Salmon

Washington SeaSA, my little venture buying sustainable seafood direct from fishermen for a group of about 10 families in DC, is now in year two. Latest on the menu: sockeye salmon from Bill Webber, who fishes the flats off the Copper River in Alaska. This followed an  oyster shucking party, with the farm-raised bivalves from Rappahannock Oyster Co. They were excellent.

I first met Bill last year, when I made the trek up to Alaska to see the fishery. It didn't take me long to ask Bill if he'd ship direct to us and he said he would, as long as we met his 50 pound minimum. Which is why I corralled up my friends. It wasn't a hard sell. 

Bill sends us whole fish, headed and gutted. He also bleeds the fish on his boat, which he argues makes for a much fresher fish. Blood begins to decay once the fish dies and that in turn degrades the flesh, so if you remove the blood -- with a special pressure tube he developed -- you can slow down the clock. He then ships the fish to us in a chilled pack and I drive out to Alaska Airlines' cargo dock to pick it up.

Now, when you buy salmon in the store, you only get the fillet. Getting the whole fish is a different story. I fillet the salmon on our kitchen counter (with an excellent sashimi knife I got from Japan). Aside from the fillet, I'm left with the rich belly meat, which is the bacon of salmon and is excellent fried in a pan. (What can I say, pork belly, salmon belly, it's all good). Then there's the carcass which usually has about a pound of meat on it. These "waste products" amount to a lot of food.

So what do you do them? 

With our last fish, I made stock, layering sliced onions and thin fennel stalks and drizzling them with olive oil. Then I placed the 2-1/2 pound liberally salted carcass on top, covering and then sweating the fish on a low flame for 20 minutes. I then added water and a cup of dry white wine to cover, simmering it for another 20 minutes. Finally, I took it off the heat and let the fish sit for an hour to release its essence. This follows Rick Moonen's method in Fish Without a Doubt: The Cook's Essential Companion, which is now my go-to fish book. Like many chefs he does not recommend using salmon for stock, which is a shame.  Salmon stock is bursting with flavor and isn't oily. But it helps if it's very fresh.

Once the stock cooled, I strained it, and then removed the meat from the bones, ending up with a big container of salmon delicately flavored by the fennel. I ate salmon salad sandwiches for several days, though you could also make salmon croquettes, as another friend did with the remnants of her stock.

Since we had eaten our fill of fresh salmon over a couple of days, I took a remaining fillet and cut thin paillards --  angled cuts 1/4 inch thick -- a wonderful technique I also got from Moonen's book. I salted them, wrapped them up in plastic wrap and froze them (a typical Japanese home-cooking method). These can be taken out and cooked immediately in a toaster oven or in a broiler. They cook in about 4-5 minutes if frozen, or about a minute on each side if defrosted or fresh. So it's a really fast dinner.

With the stock on hand, I was thinking paella but was short a few ingredients. I went ahead anyway since I wanted to use the stock.

I sauteed a fennel bulb, an onion, half a red pepper, 2 slices of bacon, a clove of chopped garlic and an Italian sausage I had laying around. When the veggies were soft and the meat brown, I added just over a cup of arborio rice and sauteed it for a minute. Then I poured in a cup of simmering stock, with a generous pinch of saffron, stirring now and then. As the stock was absorbed by the rice, I added more. What I wouldn't have done for a dozen mussels or clams!

Halfway through, I oiled up three of the frozen paillards and put them in the broiler. They sizzled while the paella continued to cook in the stock.

With everything nearly done, I sauteed a bunch of rainbow chard and garlic from the garden and out came the dinner -- a thoroughly satisfying plate of pseudo-paella, broiled salmon and sauteed chard.

Using the whole fish is a bit of work, or rather it takes time to prepare. But once you have the fish, you realize all the possibilities at hand. Now, if I could just get salmon roe in Bill's next shipment.

Addendum: Here's another tip. Fire up your grill. Cut the stalks off a fennel bulb. Rub a fillet with olive oil and season it with salt . When the fire has burned down to medium heat, lay the stalks over the grill and lay the fish on top. You'll have fennel perfumed salmon. The salmon should flake when done, but still be visibly moist inside. Remove from the fennel, then drizzle more olive oil, lemon and/or fresh oregano on the fish and serve.

- Samuel Fromartz

The Fight to Save a DC Park

I never thought I'd be involved in a fight to save a city park but here I am.

The Marines are progressing with plans to move and expand their facility in Washington D.C. They are looking at one option of taking over Virginia Avenue Park where I happen to participate in a community garden.

Needless to say, the 60 or so families in the garden are not happy, nor are those who use this open space to run their dogs, walk, or bike. In large part, this park has become a wonderful community resource because of the garden. Over several years, gardeners have worked to restore the park, which was a previously run-down lot.

While I see the value of bringing more vibrant development to this area, it should not be at the expense of the community nor at the cost of open space in DC. Indeed, this open space could serve as an anchor and attraction to new development.

If the Marines choose the park for their development, it will extend their barracks and facilities down 8th St. SE and nearly connect with the Navy Yard, making for a large nearly contiguous military facility on Capitol Hill South. As currently envisioned, the new development could approach nearly 1 million square feet.

As one person said to me, while sympathetic to the security needs of the Marines to move their current barracks, "I don't want Quantico on Capitol Hill." 

To promote other options, the Save Virginia Avenue Park has a facebook page and a petition, which we encourage people (especially DC residents) to sign, "friend," and Tweet. We want a good neighbor in the Marines. We just don't want to lose a park.

Thanks to our friends at Roadside Organics for the video.

- Samuel Fromartz