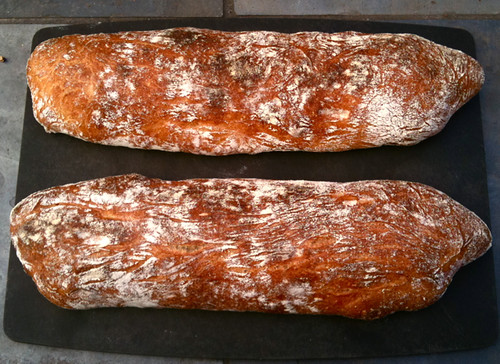
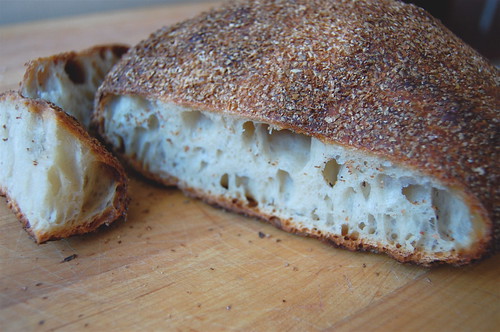
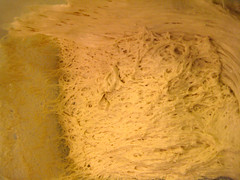
I've been working on this Italian ciabatta for a couple of weeks, writing about the process as I go. I'm not sure where it will all end up, but it has been fun. This bread is made with a biga, or a hunk of stiff prefermented dough with a pinch of yeast, that rose for 16 hours. I then mixed the biga into the final dough, which itself rose slowly in the refrigerator for another 19 hours. The result was a light, sweet, and chewy crumb and crisp dark crust that made for a perfect sandwich today -- or actually two.
ChewsWise Blog
Top Chef for Bakers
Chefs get all sorts of attention in competitions, but bread bakers, fugetaboutit!
But I was recently in Las Vegas for a bread convention - yes, related to the new book I'm working on - and observed a bit of the Louis Lesaffre competition. In this stage, national teams from North and South America competed for two coveted places in the Coupe du Monde in Paris in 2012. USA made the winning spot as did the team from Peru. They will compete against 10 other national teams at the final competition. Background on the competition process is here.
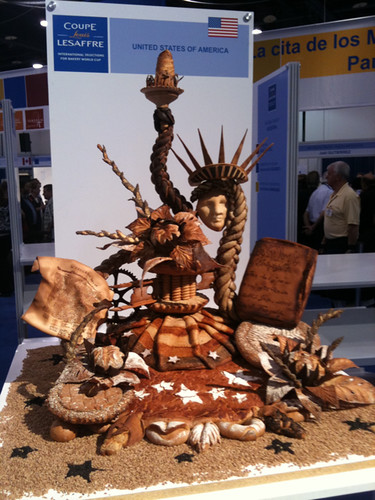
Bread sculpture by Harry Peemoeller, instructor at Johnson and Wales, Charlotte, NC. Yes, this is all made of bread!
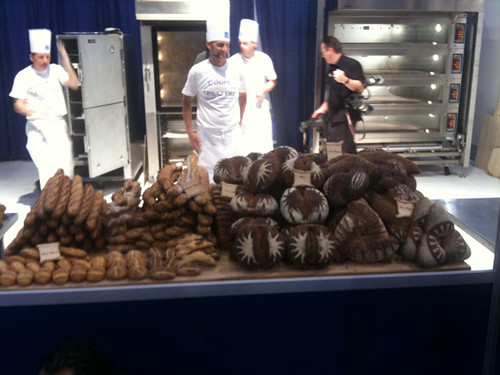
Mike Zakowski, The Baker (Bekjr), Sonoma, CA, with his baguettes, which are obviously central to this competition.
Pictures of Mike Zakowski's breads.
One of Mike's entries was a loaf with bolted whole wheat flour (part of the bran removed) mixed with white flour, flecked with cracked spelt that had been soaked in agave nectar for 12 hours. It was the best bread I had at the entire convention, though there were many great breads. I asked him where he got cracked spelt, since I had never seen it. He said he grinds it himself with a hand grinder. Although he works at Artisan Bakers in Sonoma, he sells his own bread at a farmers' market in Oakland.
I did take pictures of the beautiful viennoiserie made by Jeremey Gadouas, a baker from Bennison’s Bakery, Evanston, IL, but alas they were too blurry.
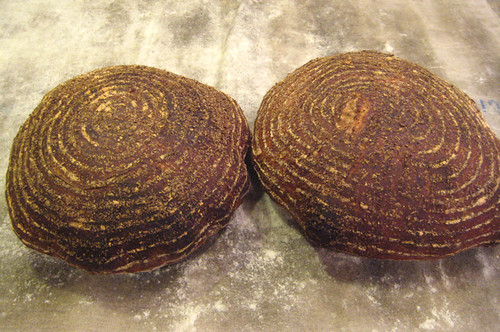
There was a lot of baking going on outside the competition. Here are a few of the rye breads made by Jeffrey Hamelman, the master baker at King Arthur Flour.
Hamelman's 40% rye, it had nuts and dates I think but I may be wrong.
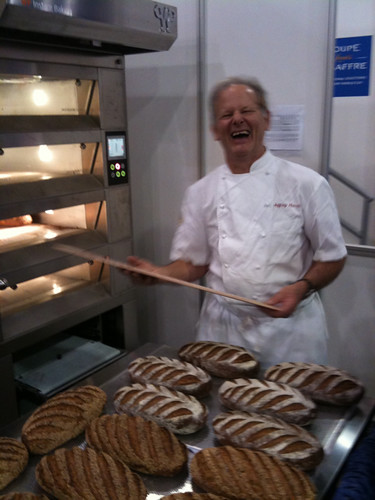
Jeffrey Hamelman in a light moment by the deck oven.
Hamelman's 60% rye. The one barely viewed on left has sesame seeds. The scoring (cuts) on these loaves were beautiful.
- Samuel Fromartz
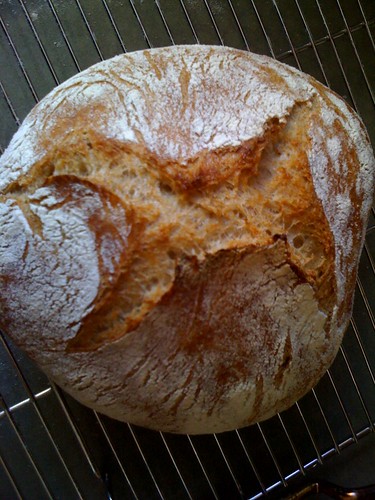
Ciabatta, crumb shot by Sam Fromartz
As I start a new book, what's more important, the bread or the holes?
I've been a bit quiet here lately, in part because I've launched into a new project that I talk about here with writer Tim Carman. For those who have followed ChewsWise blog, it's no surprise that it has often taken a turn towards bread, which reflected a hobby. But about six months ago, a couple of friends told me I was already writing the book on the damn blog so why not just write a real book. So I am, not a recipe book, but a narrative about bread, thanks to Viking/Penguin.
To that end, the photo above is of a loaf I've been working on lately -- ciabatta. You will see many recipes for ciabatta (Italian slipper bread), but here's my take: aside from the generous water content, the recipe's not the most important thing. What's crucial is the way you flop out the dough to either create a marvelous network of airy holes or a denser and unsatisfying loaf. In one batch of dough, I made both. Conclusion: It wasn't the dough but the way I manipulated it. Needless to say, the picture above (shared with yeastspotting) was the success story. Now let me see if I can replicate my own technique and then dissect it enough to write about it.
- Samuel Fromartz
Flatbread, a Perfect Summer Bread
Image: Flatbread with chickpea, potato, spinach stew
I wrote a story that ran today in the WaPo on a wood-fired baking class at King Arthur Flour. Here's the companion recipe on flatbread.
Summer is a great time to make this yeast-free flatbread, which takes minutes to cook on top of the stove. The recipe calls for chapati flour, a very finely ground whole-wheat flour that is available in Indian markets. You can use regular whole-wheat flour, but it must be sifted to remove any large particles of bran.
MAKE AHEAD: This dough is best made in the morning for use later in the day. The balls of dough can be refrigerated in a lightly oiled resealable plastic food storage bag for 2 or 3 days; let the dough come to room temperature before rolling. The flatbreads can be wrapped in aluminum foil and reheated in a 400-degree oven for about 5 minutes.
Makes 12 flatbreads
Ingredients:
3 cups (400 grams) whole-wheat flour or chapati flour, plus more for the work surface (see headnote)
Scant 1 1/4 cups (265 grams) water
2 tablespoons vegetable or olive oil, plus more for the bowl
1 1/2 teaspoons (8 grams) salt
Directions:
Combine the flour, water, oil and salt in a bowl until they come together into a mass. Let sit at room temperature for 20 to 30 minutes while the flour absorbs the water.
Lightly flour a work surface. (All-purpose flour can be used for this; if using whole-wheat flour, make sure it has been sifted to remove any large bran particles.) Transfer the dough to the work surface and knead for about 5 minutes by pushing down on and spreading the dough and then turning it over on itself, being careful not to rip the dough. It should be smooth and elastic. Form it into a ball and place in a clean, oiled bowl. Cover with plastic wrap and let the dough rest for 8 to 12 hours.
About 45 minutes before you want to bake, spread out the dough on a lightly floured counter and form into 2 logs. Cut each log into 6 equal pieces. You should have 12 pieces of dough that weigh about 2 ounces each; evenly distribute any leftover dough as needed.
Shape each piece into a ball. Let the balls rest for 30 minutes at room temperature under plastic wrap.
Place a cast-iron skillet over medium-high heat; cover with a lid. (Alternatively, invert a wok over a burner for cooking on the underside of the wok.)
Liberally flour a work surface. Flatten a dough ball and dust it lightly with flour, then use a rolling pin to roll it out as thin as possible (7 to 9 inches in diameter), rotating the disk to keep it even.
When the skillet is smoking lightly, gently lift a disk of dough. Place it in the skillet and cover immediately. Cook for 30 seconds to 1 minute, then flip the dough. Cover and cook for 30 seconds. (If using an overturned wok, simply place the bread on top of the wok and flip it when ready.) The breads will bake in 2 minutes and should be blistered and dark in spots.
Remove the flatbread and cover with a towel or aluminum foil to keep it from crusting over. (Dot it with butter and fold it in half if you like). Serve warm. These can be made in advance and stored in a resealable plastic container.
Recipe adapted from Jeffrey Hamelman, a master baker and bakery director at King Arthur Flour. Thanks to Yeastspotting for including this post.
Behind the Taste and Health Quotient of Whole Grains
Image: Whole Wheat Chocolate Chip Cookies, source Washington Post.
Truth be told, I was a little worried by the recipe testing I did for my story, "Whole New Ballgame for Whole Grains," in the WaPo. I was baking out of Kim Boyce's recently published Good to the Grain: Baking with Whole-Grain Flours
But Boyce, a former pastry chef at Spago and Campanile in Los Angeles, does not shy away from butter. Now I like butter, but in baking muffins, scones, pancakes and waffles steadily for about three weeks, I was eating a lot of the stuff. (Yes, it adds incomparable flavor to baked goods). I was also eating more sugar than I usually do, though Boyce relies on dark sweeteners like brown sugar and unsulphured molasses, though does not shy away from white sugar when needed. Here's the nutritional information for the rather large-size whole wheat chocolate chip cookie pictured above: 240 calories, 7 grams saturated fat. And yes, it tastes phenomenal.
So does this defeat one of the oft-stated purposes of whole grains, which is to boost the health quotient in your diet? As we know, whole grains add fiber, minerals, antioxidents and vitamins, most of which are lost in refined white flour.
I have two thoughts about this. Yes, the added saturated fat and sweeteners do reduce the health of the baked good. On the other hand, they do end up higher on the health spectrum than a baked good made with white flour, butter and white sugar. And this is especially true of baked goods that you buy in the store, which I often find are far more loaded with sugar than these recipes.
But, more importantly, consider the purpose of Boyce's exercise. She wasn't aiming to make a health cookie. As I wrote in the article, "Although purists might bristle at her use of white flour, butter and sugar, it's important to remember that Boyce is not aiming for low-fat and sugar-free. She is aiming for taste: a new kind of taste arising from these under-used grains." And that emphasis on taste may open the uninitiated to the flavors of these grains.
The bottom line -- these pastries are delicious, the kind of thing you'd make on the weekend or a special occasion. The carrot muffin would be a slam dunk on Mother's Day, for example. But there are healthier ways to get whole grains, through porridges and breads that Boyce also dabbles with in the book. Another direction, try the risottos or salads or stews that Lorna Sass has in Whole Grains Every Day, Every Way
I consume whole grains largely through breads, made with a mix of flours, water, salt and yeast or sourdough starter. But I often make barley risotto (high in soluble fiber) and usually have cooked whole grains in the refrigerator that can be easily added to a salad. I'm also starting to experiment with sprouted whole grains. And I'll be posting on a spelt pizza dough recipe so check back soon.
By the way, I was also thrilled that my friend Barry Estabrook (aka Politics of the Plate) was right next to me in the food section. He just won a well-deserved Beard Award for his story on slavery in Florida's tomato fields.
- Samuel Fromartz
This Organic Loaf: Sourdough Spelt with Flax Seeds
Imagine if Matisse limited himself to one color. His paintings wouldn't be quite so beautiful. It's the same with whole grains. Once you start cooking with them, you realize white flour is kind of monochromatic. Whole grains extend the range of flavors and textures in baking, but you need to know how to use them. Take spelt, for example. This grain goes back at least 7000 years, which means bakers had a lot of time to play with it. Unlike whole wheat flour, it doesn't have bitter notes -- in fact, it is slightly sweet -- and it creates a tremendously rich, nutty crust. For these reasons, I recommend starting with spelt rather than whole wheat flour if you're new to whole grains.
Now whole grains have the reputation of being heavy, leaden, bombs, but that needn't be the case. This loaf was light and airy, not dense at all (though the crumb was fairly tight). While open-hole ciabatta loaves are all the rage these days, this loaf can make a nice sandwich or toast. The flax seeds add an assertive bite and crunchiness. Paired with spelt, they complement one another.
When I bake, I aim for taste, texture and the experience of a stellar loaf, but that said, this bread packs a nutritional punch. One serving of spelt contains 8 grams of fiber and a whopping 10.7 grams of protein. Flax seeds are chock full of omega-3 fatty acids and are also extremely high in fiber. Since the loaf contains 50% white bread flour, those figures are reduced, but still, a couple of slices for breakfast will last you until lunch.
I use a stiff sourdough starter in this dough, which helps build up the mild acidic flavor notes. The bread flour adds structure, so the loaf isn't too dense, but as you get used to spelt you can try reducing the percentage of white flour. For those who work with bakers percentages, this dough has a roughly 70% hydration (excluding the flax seed soaker).
Can this loaf be made with instant yeast instead of sourdough starter? Probably, though I haven't tried it. Thinking out loud, I would make a biga starter with 1/4 teaspoon instant yeast, 106 grams water and 80 grams of each type of flour. Then I would try adding another 1/2 to 1 teaspoon instant yeast to the final dough. If you try this, let me know how it works out.
This recipe makes two large batards or boules.
Sourdough
70 grams stiff starter
80 grams water
60 grams organic white bread flour
60 grams organic spelt flour
Flax Seed Soaker
1/2 cup (85 grams) organic flax seeds
75 grams water to barely cover the seeds
Final Dough
250 grams sourdough
Flax seed soaker
280 organic white bread flour
280 organic spelt flour
400 grams water
14 grams coarse sea salt
1. Mix starter, cover and let sit overnight (8-12 hours) at room temperature of about 75 F degrees. Pour the flax seeds into a separate bowl and just barely cover with water, then cover the bowl. By the morning, the flax seeds will have absorbed all the water. (In a pinch, even 2 hours of soaking will do). Ideally, the starter will have risen fully and then just started to deflate.
2. Combine the starter and water in a bowl and mix it up with a wooden spoon or spatula until combined. Add the flours and using a plastic bench scraper, spoon or mixer with dough hook, mix the dough until all the lumps of flour are gone. This will take about 2 minutes. Cover and let rest for 20 minutes.
3. Add salt and mix on a slow speed, about 4 minutes. If kneading by hand, do so until the salt is mixed throughout and the dough is starting to take on a smooth appearance, about 5 minutes. Add the flax seed soaker and using your hands or the mixer, continue mixing until the seeds are evenly distributed.
4. Form into a ball and place in a clean, oiled bowl and cover for the first rise. Assuming the temperature is around 75F, turn the dough out onto the counter and fold it at 50 minutes. Be careful not to tear the skin of the dough. Fold again at another 50 minutes. Let it rest for another 50 minutes, for a total rise of 2.5 hours.
5. Turn the dough out on a lightly floured counter, divide in two and form into rough batards or boules. Let rest for 15 minutes, then finish shaping the loaves. Place them in a floured towel inside a bowl, or a floured couche for batards and cover with a towel or plastic wrap.
6. The final rise should take 90 minutes. Or, to build up the flavor of the loaf, cover the loaves then let them sit for 30 minutes before putting them in the refrigerator in a closed plastic bag. (I use Ziploc Big Bags
7. When ready to bake, check the loaves. They should have risen by about 75%. If they have risen sufficiently in the refrigerator, keep them there until baking. Otherwise, remove one loaf and let it rise at room temperature for another hour as the oven is preheating.Turn the oven to 460 F with a baking stone in the middle of the oven and a rimmed sheet pan on the bottom. Preheat for at least one hour.
8. When ready to bake, slash the loaf in a square pattern with a bread knife or blade, then place in the oven on the heated stone. (Batards can be slashed lengthwise). Pour 2/3 cup of water into the sheet pan and close the door. Bake for 30 minutes. Turn down the oven to 420 F and keep baking for another 15 minutes. Check the loaf. It is done when you rasp it on the bottom with your knuckle and it makes a distinct hollow sound. If not yet done, turn down oven to 400 F and keep baking for 10 minutes. Then turn off the oven, open the door slightly and let the loaf sit for another 10 minutes. Repeat with the second loaf.
9. Allow the loaf to cool for at least one hour before cutting it open.
Check out this loaf and others on yeastspotting.
- Samuel Fromartz
Best Baguette in Paris 2010: An Inside Look
Each year, Paris holds Le Grand Prix de la Baguette de Tradition Française de la Ville de Paris, a blind tasting for the best baguette in the City. This is quite an affair and important for the winning baker since sales typically shoot up as does the baker's renown. (I got a taste of its importance at the boulangerie I worked at last year, which had previously won the honor).
In a rare inside look the contest, an American living in Paris applied for one of the random seats and was chosen to serve on the judging panel. (I wish she gave her name but hasn't on her blog She later revealed herself as Phyllis Flick. The result: she spent four hours tasting 163 baguettes, a record number of entries. "It was an absolutely incredible experience and for now I can’t imagine looking at another baguette," she writes.
She has an good summary recounting the experience on her blog Paris Notebook, including the caveat that not all French bread is great.
It may seem hard to believe, but a lot of mediocre bread can be found in France. Walk into your average corner bakery and if you don’t know what to look for, or to ask for, you risk walking away with a very average, and at times inedible, baguette.
Here's a list of the winning boulangeries, something you'll want to clip if you happen to be heading to Paris.
1) Djibril Bodian (Le Grenier à Pain Abbesses), 38 rue des Abbesses, 75018
2) Daniel Pouphary, (La Parisienne) 28 rue Monge, 75005
**3) Dominique Saibron, 77 Avenue du Général Leclerc, 75014
4) Yves Desgranges, 6 Rue de Passy, 75016,
**5) Philippe Gosselin, 258 Boulevard Saint-Germain,75007
6) Xavier Doué, 163 avenue de versaillais, 75016
7) Boulangerie Lohézic (Sébastien and Sylvie Lohézic) 31, rue Guersant, 75017
8) Boulangerie d’Isa (Michel Chorin, Retrodore) 127 Rue de Charenton 75012
9) Mohamed Zerzour, 50 rue de l’Amiral Roussin 75015
10) SARL Zerzour II, 324, rue Lecourbe, 75014 (SARL can be roughly translated as incorporated)
** Both are renowned bakers
- Samuel Fromartz
Winner! Snowpocalypse Bread Baking Challenge
Now that the snow is melting, turning the city into a gritty wet mess, it's time to pick the winner of the snowpocalypse bread baking challenge. There were about two dozen entries to the contest, posted on Flickr, with some amazing breads, many by first time bakers. It was hard to pick a winner (after all, I didn't get to try the bread), but based on the pictures, I could tell which ones were great.
What was I looking for? A loose crumb with nice bubbles cooked perfectly with a slightly dark crust, and just the feel of great home made bread. So without further delay, the winners are:
The gold medal to first-time baker Amanda at Metrocurean:
Amanda used the no-knead bread recipe (her slice of bread with butter is also pictured above). This was a very close call as the silver medal went to another newbie baker, Tom G. But Metocurean edged him out with her crust -- it was darker, slightly carmelized, and the bread had a very airy look. But it was very close, similar to the 2/100's of a second win in the downhill race at the Olympics. So here's a tip for bakers -- leave your breads in the oven a few minutes longer than you think is wise. The crust, with darkened bits, improves.
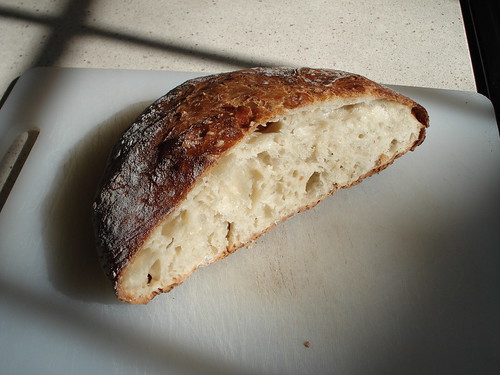
Here's the bread (above) by Tom G., which sprung up nicely.
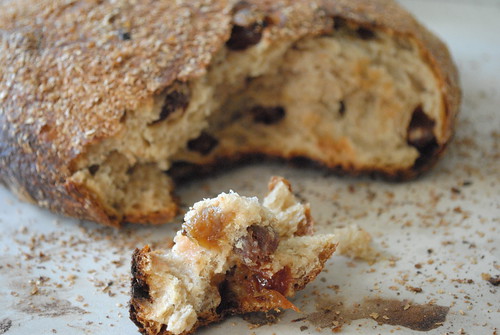
The remaining breads get honorable mentions. The Irish Brown Bread took the bronze medal and would have won in the fruited bread category (if there were one). Pictured below, it looks delicious and I gather the baker, with the screen name Governmentality, has been plowing his way through Jim Lahey's book, My Bread.
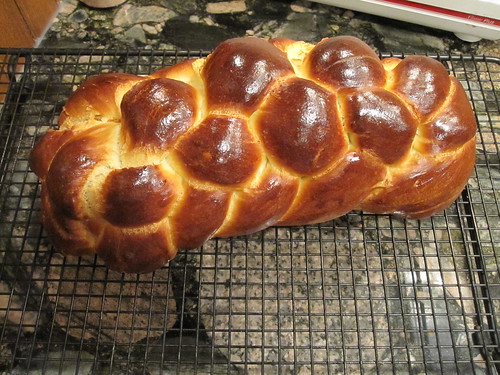
This was a wonderful example of Challah as well, by Julie Sea, pictured below.
Finally, this no-knead bread by Caroline was superb, though I think it could have benefitted from a tad longer bake.
The winner gets Jim Lahey's book (courtesy of his publisher) so we can expect more great things from Amanda. But for all those who participated, keep baking. There is nothing that compares with home-made bread, where even the failures are edible (and if they are not, cut them into croutons and toast them in the oven.)
- Samuel Fromartz.
Early Entry in Snowpocalypse Bread Baking Challenge
Here's an early entry from DC in the snowpocalypse bread baking challenge and I'd say it looks pretty tasty with a great crust. You still have until Tuesday to bake your bread and enter the contest! We've got a bunch more entries in the Flickr group here.
Snowpocalypse Bread Baking Challenge!
By Samuel Fromartz
With schools closed, the house a mess, and snow piling up, what better time than now to bake bread? I've been baking up a storm -- and now it's time for you to start too. So I'm launching the Snowpocalypse baking challenge. (Pictured above, the Organic Snowpocalypse Bread, with sourdough, white, whole wheat and rye flour.)
If you haven't baked bread before, now is the time to dive in -- because time is probably what you have. If you want an easy recipe, try the no-knead bread below. Mix your dough, let it rise for 12-18 hours, then bake it. If you can make scrambled eggs, you can make this bread.
Once done, post your pictures to this Flickr group and I'll pick a winning bread. The prize: Jim Lahey's recently published book, My Bread (donated by his publisher). His no-knead recipe is the perfect starting point for beginning bakers.
Here's the contest rules:
- Open to new or beginning bakers. No ringers who have been baking bread for years.
- Baking must occur while you are snowed in. Once the streets are clear and life is back to normal the contest is over (which I assume will be Tuesday after the holiday weekend).
- Submit a picture to the flickr group to enter the contest and make sure I can contact you. I'll pick the winning photo based on what the bread looks like. Any comments on the bread and process will be welcome.
Now, for the no-knead recipe, here's what you'll need:
- A medium bowl
- 4.5 to 5.5 quart pot to cook the bread. A dutch oven or even a pasta pot will work.
- 3 cups (400 grams) white flour. Preferably bread flour, but all purpose flour will do. Avoid cake flour.
- 1/4 teaspoon instant or rapid rise yeast
- 1-1/4 teaspoon (8 grams) salt
- 1-1/3 cups (300 grams) water
- Olive oil (other oil is fine too)
- Wheat bran or cornmeal (optional)
Note: I updated the recipe slightly with new instructions in italics.
Stir together the flour, yeast and salt. Add the water and using a spoon or your hands, mix until you have a wet, sticky, mass -- about 30 seconds. If using your hands, rub a little olive oil on your fingers and palms to keep from sticking to the dough. It should be sticky to touch, if not, add a couple of tablespoons more water.
Cover bowl with plastic wrap, or a plate (I use a plastic tray) and let sit for 12-18 hours. If your kitchen is cold, put it on a high shelf in a cupboard. The surface will be dotted with bubbles and it will have doubled in size.
When the fermentation is complete, generously dusting the counter with flour (I previously said rub olive oil on counter but using flour might be easier because this dough is so wet). Use a scraper or spoon to move the dough onto the counter in one piece so the bottom of the dough in the bowl is now the top. Though sticky, do not add any more flour. Rub your hands with more olive oil. Slip your hand under the edge of the dough and then fold the edges toward the center to make a round shape. It won't be like a ball because this dough is loose and wet. It will have a flat shape, and don't worry if it's uneven.
Place a cotton or linen towel on the counter and generously dust it with wheat bran, cornmeal, or flour. Gently lift the dough and flip it over so that the folds or seams are face down on the the towel. Dust the top of the dough with more flour, bran or cornmeal. Fold the towel loosely over the dough and let sit for 1-2 hours. The dough's ready if you gently press your finger in the dough 1/4 inch and the dough keeps the impression rather than springing back.
One-half hour before the end of the second rise, preheat the oven to 475 F. On a rack in the lower third of the oven, place your 4.5-5.5 quart heavy lidded pot.
When ready to bake, using pot holders carefully remove the pot. Take off the lid. Unfold the tea towel, dust the loaf with more flour or bran and quickly invert it and place it the pot (the seam side is now face up). Be careful -- the pot is HOT. Don't worry if it looks uneven. Put the lid on the pot, jiggle back and forth and place back in the oven.
Bake for 30 minutes, then remove the top. Bake for another 15-30 minutes until the top is a dark chestnut color. When done, use a spatula or spoon to remove it to a cooling rack.
Wait at least 1 hour before cutting into it. The bread will continue to cook during this time and if you cut into it too early, the crumb will be gummy.
Post questions in the comment section and pictures to the flickr group. Happy baking!
Seven Tips for a Home Baker
Seeded sourdough loaf with white, whole wheat and rye
Baker Dan Lepard writes a rare baking column in the Guardian newspaper in the UK, has an active web presence, and has written an engaging baking book, but here he visits with a serious home baker, Jack Lang, who lays out seven principles of baking. This quote caught my eye, because it's really true. Everyone thinks baking with sourdough is hard but it's actually more forgiving than instant yeast.
"...naturally leavened breads are very easy to manage, especially for the home baker, as the dough matures more slowly and the point when the loaf finally gets to the oven is less critical. I am convinced that naturally leavened breads, like sourdough, are great for the home baker and less problematic that other quicker yeasted breads."
Now onto the seven principles (with my comments in italics).
1. Use a naturally-leavened starter. “Using a sourdough starter is easy,” says Jack. “You keep it in the fridge from one month until the next, and simply refresh a small amount when you need to use it.” (If you refrigerate it, refresh it at least two times before using it).
2. Keep practicing your ‘baking routine’ until you find a method that suits you. “It was the constant baking that improved my breads”, says Jack. (Really true, it's like music. The more you practice the better you get, especially because the craft is tactile).
3. “For many of the breads I bake”, says Jack, “I make the dough the night before and leave it overnight in the refrigerator”. This is a great help in managing your time when baking at home, when there are always other things to do. (I do this too. It improves the flavor of the bread and works with your schedule, so if you mix a dough Friday evening you can bake 8-24 hours later -- whatever works by your schedule).
4. Do keep a record of the temperatures of your flour, water, dough and room when you bake. “Temperature control is very important when you bake”, says Jack, “but don’t go overboard with it”. (Yes, and use a bit more sourdough in the winter and less in the summer, as higher temperatures speed fermentation -- the ideal though is 76-78 F).
5. “Food processors are great for mixing bread, just remember to use the steel blade”, says Jack. My co-author on “Baking with Passion”, Richard Whittington, swears by the food processor and finds it much easier to use than the upright mixer. (I've used a food processor quite successfully to make dough, but I don't use it regularly.)
6. Remember that when you bake brown, mixed wheat, rye or wholemeal loaves, you will not get the same volume in the finished loaf as you will achieve with white flour, nor as open a texture to the crumb. Just remember this and be content. (True to a point, see picture above. If you make a very moist dough with whole grains you can achieve a less dense crumb but moist doughs are hard to work with -- go back to point 2).
7. And finally, “Bake the dough from cold”, says Jack, who lets his dough prove overnight in the refrigerator at 4ºC (39F). This, he feels, gives a better result. (Sugars develop in a long slow rise, so the bread flavor will improve. The sour acidity in a dough also increases with lower temperature, so if you want higher sour notes by all means refrigerate for 12-24 hours. Depending on the degree of fermentation, though, you may need to let the rise continue at room temperature).
Addendum: I just got Lepard's book, The Art of Handmade Bread: Contemporary European Recipes for the Home Baker

What to Do When Alice Waters Calls, Seeking Bread

By Samuel Fromartz
I was leaving the gym when I checked my messages. Alice Waters' office at Chez Panisse was calling -- yeah, right. Who was this really?
When I called back, it turned out Waters was calling and looking for a baker for her charity dinner in Washington, to replace one who had dropped out. Barton Seaver, a friend and chef at Blue Ridge, suggested me. "We hear you make the best baguette in DC," said Sarah Weiner, Waters' assistant. "Well, yeah, I won a contest," I stammered, "but I just bake at home. The most I've baked was for Thanksgiving dinner."
They needed to feed 40 -- at a $500 a plate dinner at Bob Woodward's house. Could it be done in my home ovens? I said I'd call back. I went home to figure out how much bread I needed to bake and realized I could probably do it -- 5 big loaves and several baguettes. I then called Peter Reinhart -- the renowned baker and author I've known for a couple of years -- to see what he thought. "That's not a lot of bread," he said, and he encouraged me to give it a whirl.
So began my first gig as a professional baker -- at an Alice Waters' dinner.
I quickly settled on breads I made time and again and eat at home -- a pain au levain made with sourdough and a mix of white, whole wheat and rye flours; a pane casareccio di Genzano, an airy white big loaf crusted with wheat bran that I picked up from Dan Leader's Local Breads; and of course, my baguettes.
I've never baked this much bread before, so I worked out a timeline -- and good thing too, since I would need to begin Friday to have the breads ready on Sunday. I started by feeding 50 grams (about a quarter-cup) of sourdough starter Friday morning, building it to 150 grams. On Friday night, I fed it again to take it up to 450 grams. Saturday morning, I refreshed it a third time. By Saturday evening, when I needed the ripe starter to make my doughs, I had over 1500 grams (3.3 pounds) of the stuff. With that steady feeding every 8-12 hours, the starter was bubbling, itching to impregnate the dough. It's pictured at left, and below, in the big bin on the right.
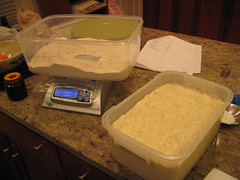 I measured out the flours and began mixing the dough. I don't really knead or use a mixer. Rather, I combine the ingredients by hand until they come together. Then I let the shaggy mass rest so the flour slowly soaks in the water, then fold it over every hour or so to develop the gluten. By the end of the process, the dough glistens with moisture. If you pull away a small piece and stretch it, you should be almost able to see through it -- the so-called windowpane test that shows when a dough is done. This folding technique is a cousin to the no-knead method, since you just fold over the dough and let time do its work. It works beautifully, especially since my home mixer couldn't handle the volume of dough I made.
Now the magic began -- the first rise, the source of all flavor -- and luckily it was a chilly night. Why was that important? Because I let my sourdoughs rise in an unheated basement storage room that is about 55F. That's the perfect temperature for a languid fermentation, when the sugars in the bread develop. Bakers buy proofing cabinets that cost thousands of dollars to get this temperature with refrigeration. My solution was less precise, but it worked fine. The genzano and baguette doughs rose in the refrigerator, since they contained instant yeast as well as sourdough and I wanted a slower fermentation.
At 7 the next morning, I took the pain au levain dough out and let it warm up for about an hour. I then shaped three boules, letting them rise for 2-1/2 hours. In the meantime, I heated up the baking stones in my double-oven. Then I repeated this with the Genzano loaf, about an hour later, and then the baguette.
The rise went well, full of oven spring. I attribute that to the levain, which you'll recall had built over a 52-hour period with successive refreshments, including the last one in the dough. (Pictured below are the pane casareccio di Genzano - Genzano Country Bread).
I finished baking at about 2 p.m. and let the breads cool, then delivered the loaves for the dinner. Jean-Pierre Moullé, the chef at Chez Panisse, was there to greet me. We talked briefly about the breads and I mentioned I was a home baker, not a professional.
"I know, but you did not bake these at home," he said.
"Yes, I did," I countered -- and I noticed his eyebrow rise a bit.
Later that evening, at a party preceding the dinner, Alice Waters took me aside, bread lover that she is, and thanked me warmly. It was a nice moment.
For a home baker, there's always the moment of anticipation when the bread comes out of the oven and you wait for it to cool before tearing into it. Alas, with these loaves, I didn't get a chance to cut into them, to evaluate the flavor and aromas or assess the interior crumb or the density of the crust -- all crucial to a decent loaf. But I trust they were fine.
The thing is, I don't bake for a living. There is no daily pressure, no waking at 1 a.m. to get to the ovens, no staff, no orders. It's just me and the bread. And until yesterday, I've only given my breads away to friends. Now I've donated them for a worthwhile cause. Maybe I've just widened the circle of people who eat my bread. And that's just fine.
