By Samuel Fromartz
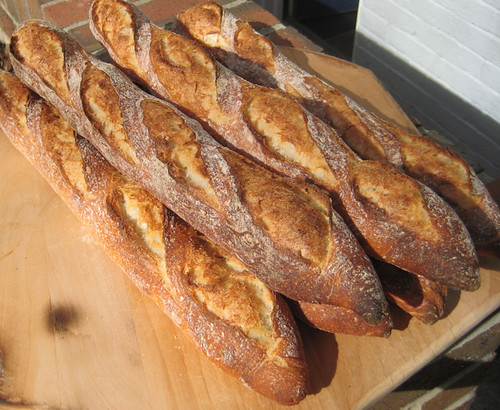
This recipe may be intimidating, but, hey, who isn’t up for a challenge? Experienced home bakers will likely recognize the steps, which took time and patience to develop. I had been drawn to the baguette a decade ago, then gave up thinking it was impossible to reproduce in a home oven. But over the past couple of years I went back to it, tried different techniques and then finally arrived at a recipe I was happy with. To read more about that process - which led to an award winning baguette - read the essay I posted here.
Beginners will need to be patient—to start baking bread with this recipe is like jumping into calculus after third-grade math. So here’s a tip: Pick up Daniel Leader’s bread baking books, Richard Bertinet's Dough (the DVD on kneading is worth the price) or Peter Reinhart’s The Bread Baker's Apprentice or his more recent Artisan Breads Everyday and try their baguette recipes before plunging over the dark side.
Should you decide to skip the DIY apprenticeship and go directly to the recipe below, results may vary. This is a wet, slack dough that makes it a challenge to shape. If you end up with something that looks like a mutant flat bread, don’t despair. Scarf it up—the rich flavor, bubbly internal crumb, and crisp crust will likely surprise you, even if does not approach the Platonic ideal of a Parisian baguette. Try and try again to get it right. And remember, it's all in the technique, which you will need to practice and play with, admitting defeat at times. The recipe itself is secondary.
And welcome visitors from Wild Yeast Blog's yeastspotting.
Equipment
- Digital scale with gram measurements (read weighing rant)
- Plastic bin or bowl
- Dough scraper
- Baking stone
- Rimmed cookie sheet or cast iron frying pan
- Four kitchen towels
- Parchment paper or couche
- Razor blade
- Cutting board
- Cooling rack
Ingredients
Makes four baguettes
- 90 grams sourdough starter, 100-percent hydration, made with equal parts of water and flour by weight, fermented for 7 to 10 hours. (To make this starter, I use 25 grams ripe and active sourdough, 50 grams flour and 50 grams water. After it ferments, I then use 90 grams of it in the bread and refresh the rest for future doughs).
- 420 grams water
- 590 grams flour (King Arthur Organic All Purpose Flour, Whole Foods 365 brand Organic All Purpose Flour or King Arthur All Purpose Flour are ideal, though King Arthur Bread Flour might be easier for a beginner)
- 10 grams whole wheat flour (Bob’s Red Mill Organic Whole Wheat Flour)
- 13 grams sea salt
- 2 teaspoons instant dry yeast (such as SAF Instant Yeast), though I cut this back to 1 teaspoon in the summer.
- Olive oil to grease bowl
- Cornmeal or semolina to dust cutting board
DAY 1
Pour starter and yeast into bowl and add water, mixing until the starter breaks up a bit.
Add flours and salt and mix for a couple of minutes. The dough will be heavy and shaggy. Let it rest for 5 or 10 minutes, covered with plastic (I put a plastic tray over my bowl).
Put a little olive oil in your palm and oil the counter so it has a very thin sheen of oil on it. The oil should keep the dough from sticking. Do not flour the counter. (This tip on oiling comes from Dan Lepard.)
Use a scraper to move dough onto the counter and begin to knead by stretching and folding dough, trying to use your finger tips. Tip: Click here to see a kneading video by Richard Bertinet on Gourmet.com, though he is demonstrating on a sweet dough.
After kneading for 5 minutes, scrape mass into a clean bowl or plastic bin. Cover and let rest for 20 minutes.
Oil the counter again if necessary and remove dough to counter. Stretch it until 1-inch thick then fold top and bottom in thirds like a letter. Do the same left to right. Click here for the Wild Yeast blog video of this technique.
Put in bin, cover, let dough rest 20 minutes.
Remove from bin, fold again, and put back in covered bin for 20 minutes.
Remove from bin, fold again for the third and final time. Clean bin, oil lightly (with 2 tsp olive oil), and put dough back inside. Cover and place in refrigerator for 12 to 24 hours.
DAY 2
Put baking stone in middle of oven. Place a thick rimmed cookie sheet or cast iron pan on oven floor or lower shelf. Preheat oven to 470F (245 C).
Put a little olive oil in your palm and oil a 20-by-20 inch (1/2-by-1/2 meter) section of the counter.
Then remove dough from container. Cut dough in half. Put half back in container and into refrigerator.
Cut dough into two rectangular pieces (about 250 grams each) and gently stretch into rectangles 5-by-7 inches (13-by-18 cm) with the long edge facing you.
Be careful not to press and destroy all the bubbles inside the dough.
Cover with light towel and let rest for 5 minutes.
While dough is resting, cut parchment paper large enough to fit your baking stone. Dust paper with flour. Roll up 3 kitchen towels tightly. Set aside. (Or if you have a couche, dust it lightly with flour).
Shape dough into a log by folding top and bottom of rectangle toward middle and gently sealing the seam with thumb. Then fold top to meet the bottom and seal seam. You should have a log about 1.5 to 2 inches thick (4 to 5 cm). Gently roll and stretch into a 14-inch loaf (36 cm) or just under the size of your baking stone. Don’t worry if it’s uneven. Tip: click here for a decent video of technique.
Place each loaf on parchment paper about six inches apart, seam side down. Place one rolled up towel underneath the paper between the loaves and one under each other edge, supporting their shape. Tip: Leader describes this in his book. (Or place on couche, with loose pleats between the baguettes).
Cover with light kitchen towel and let rise for 45 minutes to 1 hour.
BAKING
Put 2/3 cup water in measuring cup. (I boil the water).
Remove towels from under the parchment paper and carefully move the paper with the loaves onto a flour-dusted overturned cookie sheet or cutting board. Dust top of loaves very lightly with flour. (If you used a couche, carefully lift loaves with a bench scraper and place on parchment paper on a cutting board). Use a bench scraper to gently adjust the loaves and straighten them out.
Make four cuts on the top of the loaf with a razor blade, 1/4-inch deep, running lengthwise on the dough. A swift slash at a sharp 20-degree angle works best.
Take cutting board and slide parchment paper with baguettes onto hot baking stone. Shut oven door. Open door, and carefully pour 2/3 cup water onto cookie sheet or cast iron pan. Be very careful if using boiling water. Shut door. Do not open the oven again while baking.
Check baguettes after 18 to 20 minutes. They should be dark brown and crusty. If pale, continue baking for 1 to 2 minutes. Let cool for 20 minutes on rack before eating. They are best eaten within 6 hours.
While baguettes are baking, form the remaining dough into loaves or leave for up to 24 hours and make fresh loaves the following day.
Note: I have modified this recipe slightly since it was first published. There are also many more tips in the comments to this post and I encourage others to post their modifications.


can't wait to try the winner.
Posted by: michaela | May 12, 2009 at 12:03 PM
I'd like to try this; I've baked bread (once in a while) for years, but never tried baguettes. But, this really looks like a recipe for "pros." I don't have kitchen scales, don't know what sourdough starter is or where to get it. What does "100-percent hydration" mean? Perhaps I should just pass on this one?
Posted by: Linda C. | May 12, 2009 at 06:59 PM
You achieved the Platonic ideal -- truly beautiful.
Posted by: Susan/Wild Yeast | May 13, 2009 at 12:57 AM
Thank you for that recipe! Baguette is also one of the bread I have a hard time to make. Mine are always too dense, whether they're made with sourdough or not. What I can see from your recipe is that I should use more water than I used to. I can't wait to try your recipe!
Posted by: Niels | May 13, 2009 at 02:53 AM
Excellent article & recipe, and great results - this is really very impressive. Michaela: as the article says, this is definitely an advanced recipe. If you want to go through some simpler stages (that still make great bread), and learn about the baking terms such as "sourdough starter" and "100% hydration", can I recommend that you have a look at my site, http://www.breadsecrets.com/ ? If you click the button for "Techniques and Equipment", there's a link to a page on weighing and measuring ingredients which explains why serious bakers use scales rather than cups.
Posted by: Guy Snape | May 13, 2009 at 06:14 AM
Could you post the recipe with approximate amounts by volume? I do not own a scale.
Posted by: Kelsey Smith | May 13, 2009 at 07:08 AM
Impressive honor for your baguettes! I'm so glad you decided to share the recipe :)
Posted by: Hillary | May 13, 2009 at 12:57 PM
What temperature do these bake at?
Posted by: dmunn | May 13, 2009 at 04:43 PM
Linda, this is definitely an advanced recipe. I would not start out here, as I mentioned in the introduction to the recipe. Instead, try some baguette recipes in well known books like those by Peter Reinhart or Dan Leader. Then go for these after you've mastered those.
Kelsey, volume measurements of flour are notoriously inaccurate, so I don't use them. If you really want to bake, you need a scale. That way, if you want to change a ratio (more flour, less water, say) you can change the weights. Volume measurements may change from day to day, which is why I don't use them in recipes.
D Munn, beginning the recipe on Day 2 I say preheat the oven to 470F. That's a temperature that works for my particular oven, but you may need to adjust. I err on the side of hot rather than cool and then reduce the temperature if needed. That way the crust will really brown nicely.
Thanks all the rest for your comments. I look forward to posting more recipes too.
Posted by: Samuel Fromartz | May 13, 2009 at 09:22 PM
As a french, parisian and a bread lover, I can tell you that your baguettes are a lot lot "platonic ideal" than the ones we can see here in some french bakeries.
The color, the crust, the shape are all perfect. I wish you'ld show us the crumb though to appreciate your bread even more.
I'm curious about the effect of the WW flour here: 1,6% of the total flour weight seems not a lot..?
PS. In France, a regular baguette is made with only white flour and yeast (of course, not talking about all the improving agents etc..). If you add some WW or rye, it becomes a "baguette de campagne" (different from the regular by the flour on the crust). If it's made with sourdough (and less than 2% yeast), it's called "baguette au levain". I guess I'll call yours the Fromartz baguette.. and I think it's pretty cool ;)
Posted by: sandra | May 15, 2009 at 07:32 AM
Just found your site through Wild Yeast. Interesting. Oh, and I love your bread.
Posted by: Angela@spinachtiger | May 15, 2009 at 09:04 AM
I have miles to go before I'm ready to try this one. It looks wonderful! I am envious.
Posted by: Mary | May 15, 2009 at 11:25 AM
I have been making a lot of breads for about 2 years (about 100) and am crazy for bread-making. I made a french bread last nite and was not happy with the results. Then I stumbled upon your recipe, I started with the starter last night and made the dough this morning. Unfortunately, I didnt have the patience to wait till tomorrow to bake it. I took out half the dough after 6 hours (I had made half the recipe), put the rest back for tomorrow, and made a loaf. It is the best french bread I have made. Love it! Thanks so much.
Posted by: salma goldstein | May 15, 2009 at 07:41 PM
Sandra, in France I made baguettes with flour, yeast, water and salt. But I found when I returned home that when I tried to duplicate the recipe the baguettes did not have the same complex and sweet flavor, even after rising 24 hours in the refrigerator. This may be due to differences in the wheat itself -- the French wheat we used at boulangerie Arnaud Delmontel definitely have a different aroma than the white flours I use in the states.
To develop that flavor, I began adding whole wheat flour. At first I tried 10% but it was far too much, then continued to cut it down. Now it's down to about 1-2 tablespoons for the amount of this recipe, so yes about 1.6%. I feel the whole wheat flour is nearly invisible in the bread (though if you look closely you can see tiny flecks of darker wheat). But it does influence the flavor, in part, I think, because it stimulates the sourdough in the dough. If you want to activate your starter when it's a bit weak, you can always add a pinch of rye or whole wheat -- that's the idea behind what' I'm doing here. The sourdough itself is not "sour" like San Francisco sourdough. It's closer to the flavor of levain. Again, the breads do not taste "sour" but the sourdough does impart more flavor and adds to the chewy texture of the crumb. You can get that in small amounts. I recently saw another recipe for 7% sourdough (bakers percentage) in the final dough. I use 15% though may try that lower percentage.
Salma, as you discovered, you can make these after a short bulk fermentation, but the idea is to really build the flavor and texture over time, I think 12 hours is really the minimum (so mix in the evening and bake the next day). By 24 hours the flavor really develops though I have had good luck with a bulk ferment for as long as 48 hours.
Posted by: Samuel Fromartz | May 16, 2009 at 10:57 AM
I made the bread again last Sunday, the full recipe but made only 3 loaves and put some dough away. I only got a chance to bake the 4th loaf on Tues and it was the best with a thin crust and moist crumb with nice holes. I cant wait to make it over and over. In fact I think I will start a starter tonite. Thanks so much!
Salma
Posted by: salma goldstein | May 28, 2009 at 09:43 PM
Dear Samuel, it was very pleasant surprise to find your website and baguette recipe. I have been trying to activate a starter I bought from a Melbourne bakery (Australia), but the weather in Sydney is wintery, poor and rainy, I can't get the starter rising. I was very disapointed, because I've been talking about homemade bread for more than a week. I also wanted to do it in the very traditional way - without the yeast. I still keep the bowl with starter in the kitchen. I even "feed" it once a day. This morning I decided to give it a teaspoon of Diastatic Malt, because I assumed that it might be the quality of the flour that is what is sabotagging my starter. Well - what a surprise after two hours! - it is alive and I can see the little bubbles... I was wondering if I can incorporate the starter with your recipe without relying on any additional yeast. Would you please tell me what is the big deal about having or not having in the traditional recipe dry yeast?
By the way - thank you for the additional links with instructions on kneading, folding and shaping.
Posted by: Sophia Terzieva | June 02, 2009 at 07:42 PM
Oh my. I open up this subscription and I KNOW it's going to be bread. But why does it still so often just knock me over. I mean I could SMELL this bread and TOUCH it through the screen. That bread looks "last meal" good. I must find a way to make it. I think man can live on bread alone when I see a crumb and crust like this.
Posted by: Angela@spinachtiger | June 17, 2009 at 09:14 AM
thank you so much for the beautiful recipe. i am an american living in paris and am so happy to finally learn how to make baguettes! i love the texture and flavor. i would also like to learn how to make the simple white baguettes you see here in france. can you give me your recipe without the adaptations for american ingredients (it sounds like you use just the white french flour, and no starter?). thanks
Posted by: enrosque | July 04, 2009 at 01:44 AM
Bakers note: I cut the yeast down to 1 teaspoon in the summer.
Posted by: Samuel Fromartz | August 07, 2009 at 04:10 PM
Hi, wonderful baguette and very well explained every step of the recipe....the only thing is I have not a baking stone...any suggestion? Thanks
Posted by: paolo | September 28, 2009 at 08:30 AM
I always prefer baguette with garlic butter on top with pasta on it,...awesome recipe thanks.
Posted by: buy fioricet | October 15, 2009 at 01:46 AM
Hi there, and thank you very much for what looks to be a very promising baguette recipe.
Only one problem: the dough is not turning out shaggy, but rather wet and extremely sticky. So much do that it is impossible to kneed without copious amounts of flour or oil.
I have tried a few times, following your recipe to the T with a good scale. I am using King Arthur unbleached all purpose flower, and a King Arthur sourdough starter.
I thought that the only room for error could be in the starter--perhaps mine was too moist. So I've corrected my starter to ensure that it is 100% hydration. The only way to get a shaggy dough is to use much more flower than the recipe calls for.
Where else could I be off?
Thank you,
Alexandar
Posted by: Alexandar | October 18, 2009 at 06:21 PM
Great results my first tim,for which I thank you.What is meant by 'Shaggy Dough'?I used KA Bread flour and Carls Sourdough,which I have had going about a year
Posted by: jerry weinraub | November 20, 2009 at 06:06 PM
Thanks for this wonderful recipe. I have tried it 3-4 times and the taste is lovely the looks of my baguettes is less lovely. I have a question. My dough is weak and when I come to the folding part (which is difficult) and rolling, my dough it is all wrinkly and not smooth and firm. It slides (not rolls) across the surface (wood). If I use less flour on the surface, the dough sticks. Do you have any idea what I can do to improve? Thanks and Happy New Year!
Posted by: Madelene Berggren | December 31, 2009 at 07:04 AM
Here's a few tips.
First, try using bread flour which will be stiffer and easier to shape. However, you will sacrifice the soft crumb. If using AP flour, make sure it is from hard winter wheat. Call up manufacturer if unsure or use King Arthur All Purpose Flour.
Second, try folding the dough twice if only folding once. This will help build strength.
Third, minimize rolling. I hardly roll the dough and instead just roll it back and forth a couple of times and pull the dough to stretch it to the right length. If the dough is sliding across your counter, you have too much flour on the surface.
Forth, when moving the baguette from your couch or parchment rising form, try and minimize the use of your fingers to position it correctly. Use a bench knife or a spatula to make the loaf nice and straight before it goes into the oven, not your hands.
Finally, having made the bread 3-4 times you're still beginning. Keep at it and it will improve. Promise.
Posted by: Samuel Fromartz | January 05, 2010 at 10:34 AM